Tag: stucco series
DIY – The Downside
by admin on Aug.20, 2012, under Favorites, Real Estate
DIY – Do It Yourself.
I’m all for DIY whenever possible. Think that is fairly obvious from the stucco series and paver stone sections of the blog if nothing else. I was probably the kid that said, “Let ME do it” as the first phrase I ever spoke. However, there are one or two issues regarding DIY projects I feel I should mention.
++ DIY often means working on a project with family members and/or friends.
This can sometimes lead you straight back to DIY – doing it yourself, since no one else shows up to assist. As long as you are aware of this potential you won’t get discouraged or be too disappointed. But I can tell you, spending more than one valuable Saturday waiting around for someone who doesn’t show up to help can feel very defeating. There are portions of nearly every DIY project that require an extra pair of hands. Plan on some tasks to do alone – in case you find yourself – by yourself some sunny Saturday afternoon.
++ Not everyone will adhere to a schedule.
I’m a former Information Technology Project Manager. It said so on my resume and I even had it (PMP) certified. My life is organized like one big project. I like deadlines. I like milestones. I like finishing a project early (and under budget) if possible. Imagine my surprise to find the general world does not work this way and that those assisting on one or two of my projects had NO IDEA that I actually expected them to get finished at some point before my death.
This divergence in planning styles can be especially frustrating when working with family members. Patience is NOT my middle name and there have been days when having a trowel with a sharp, pointy end in my hand was just not a good idea.
++ Budgets, and Focus
Unless you’ve taken out some huge construction or home improvement loan, the costs involved in your DIY project may feel a bit overwhelming at times. As weeks turn into months, the fact that you agreed to not take a vacation this year in order to use the funds to complete a DIY project may still motivate you, but not your partner(s). By now they’re seeing pictures of their friends who DID take a vacation this year – and when they look at the project, it’s still not finished. They can’t sit on the patio yet, or can’t swim in the pool, or can’t use their new outside kitchen.
Someone will have to play cheerleader at this point or you’ll lose focus. Sometimes just taking a weekend break will be enough to stop the mid-project doldrums.
But have no fear. As long as one person can still visualize the dream project, whatever it is, and can maintain patience on the days when little or nothing seems to go right or is completed, you’ll still have probably saved thousands of dollars, and be able to enjoy for decades – a DIY job well done.
Stucco Series – The Cement Mixer Decision
by admin on Nov.14, 2011, under Favorites, Images, Real Estate
Cement questions to ask yourself…how much do you need, and how much can you properly manage?
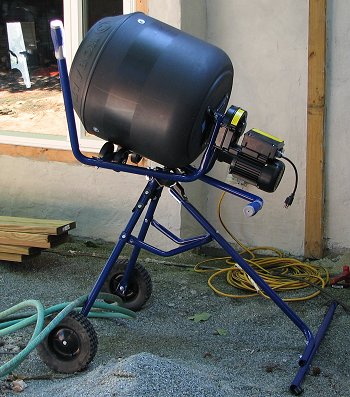
While the cement for the paver stones shown on prior posts was mixed by hand, the desire for a concrete slab near the new back door meant more and faster concrete production would be required.
Time to ponder a cement mixer.
Although most portable cement mixers are rated between 3 and 5 cubic feet we found our actual batch sizes were typically about 2 cubic feet or 3 bags of Quikcrete.
To put this in perspective, a 4-foot square of sidewalk, 6 inches thick, requires 8 cubic feet (4′ x 4′ x 1/2′) or 12 bags of Quikcrete. You can see that even a small concrete slab takes a surprising amount of cement – and work.
If you’re looking at a driveway or patio, hire the ready-mix truck to come in and pour your concrete. We did not have that option here since no local truck having the pumping capability, in this instance – long distance from the main street, was available.
Your first online research may have you believing you’ll need to spend $1500+ for a cement mixer. Not true.
We selected the Kobalt 4 cu ft Multi-Use Portable Mixer from Lowe’s. It has a 235lb mixing weight and a 2.3 cubic foot mixing capacity. This is about all a 2-person crew can manage.
The lightweight plastic drum will be both durable and easy to clean. The 1/2 hp electric weatherproof motor was sufficiently powerful to mix the cement batches we needed. Knowing this was a once-in-awhile use item, the $350 +/- price tag seemed acceptable.
You’ll need to have an assembly-line plan to complete this project. Multiple mixes, spins of the cement mixer, pours, finishing, start the next batch, and over, and over. In this case, an extra pair of hands or two will be welcomed.
The other time-consuming part of this task is concrete finishing. It is not as easy as professionals make it look. Start with a small area and work it until it is as smooth and level as you can possibly make it. This finishing skill does seem to get better the more you do – like so many other DIY challenges. But with concrete pours, you just need to learn and improve quickly!
Plan on spending 30 minutes plus cleaning the unit after use if you want to be able to ever use it again! Once concrete dries, it stays!
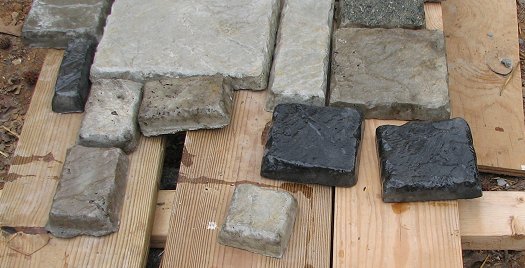
Make Your Own Pavers – Color Considerations
by admin on Nov.10, 2011, under Favorites, Images, Real Estate
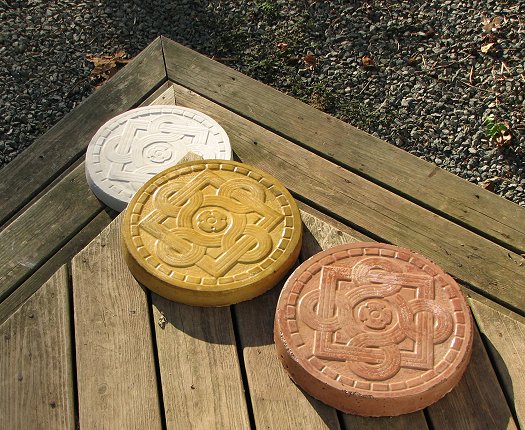
As part of the stucco series I’ve provided some images of the homemade paver stones that started it all. Here’s a good example of some of the color variations found.
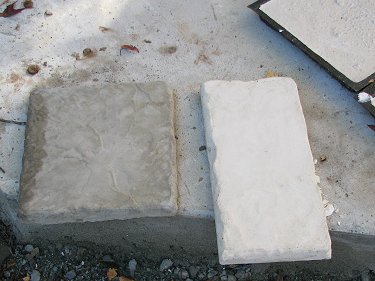
Neither of these stones have had a coat of polyurethane. The stone on the left was made with standard cement. The stone on the right was made with a premium white cement – which took a bit of research to find. White pigment powder was also added. The concrete slab these stones are sitting on is the whitest you can get just by using white sand. Yes, it can get confusing for the novice, but we’re here to learn…
I’m still partial to the large, round stone with the Celtic knot design. Here are two – one with black powder colorant added and one with what I call an “antiqued” stone appearance:
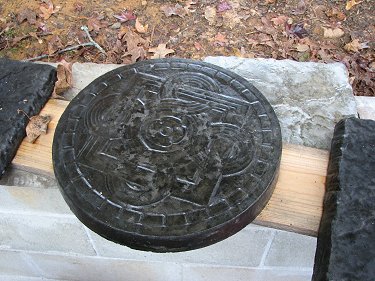
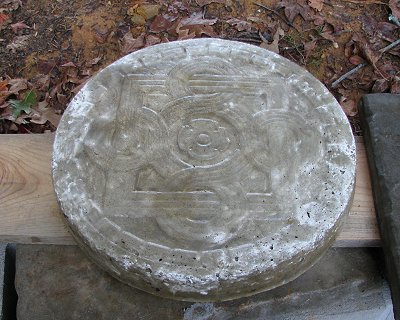
You can probably guess by now that sprinkling some white pigment powder in the mold gave this effect.
Each of these pavers have received two coats of polyurethane. A previous post showed a gold, white, and rust-colored Celtic stone.
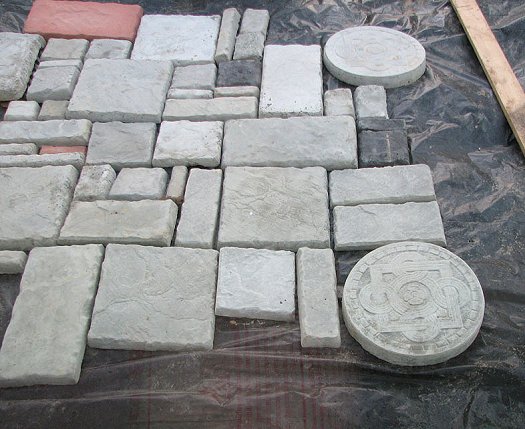
We’ve studied a LOT of stone designs for patios, driveways, walkways, etc. and found that we prefer a pattern of larger stones for our patio. The use of smaller pavers tends to get too “busy” too quickly while also making the patio layout that much more time consuming. You can view our basic pattern along with the molds used here.
I’m off this week in search of the perfect “blue” for a few new architectural elements I have in mind. Don’t forget to visit The Mold Store for a good start on your homemade paver stone project.
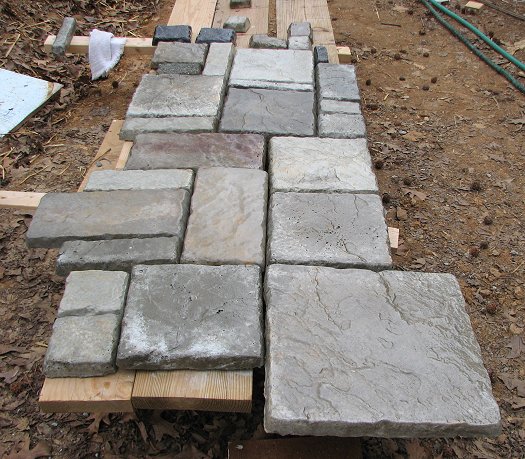
Homemade Stone Pavers
by admin on Sep.17, 2011, under Favorites, Images, Real Estate
If you’ve followed any of the “Stucco Series” posts, you’ll have seen an image or two of some homemade patio stones. There has been a little break in the stucco project since working outdoors – with temperatures approaching 100 degrees a few days – was just not fun.

But now most of the heavy-duty aspects of the redesign of the backyard area are all but complete and it’s time to contemplate a pattern for the paver stones we’ve produced. Here’s what we’ve come up with so far:
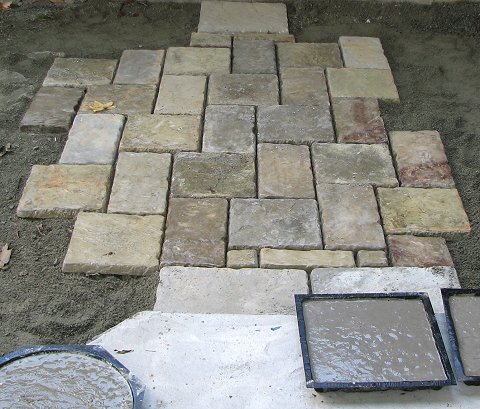
This image also gives you a look at several of the stone molds from The Mold Store – filled with their “mixture.”
Defining “mixture”…
The easiest choice is Sakrete. For about $4 a bag this mix includes everything but the water.
The less-easy choice is still as easy as one-two-three…
~ One shovel of cement.
~ Two shovels of sand.
~ Three shovels of gravel.
Blend the mixture while still dry, add water, and stir.
Take your time adding water since you can’t take it out later if you use too much. The less water you use, the stronger your concrete will be. But, for our purposes we wanted a wetter mixture of concrete so it conforms to the mold completely – without gaps.
We’ve been really pleased with the Celtic Knot stones shown in a prior post but we haven’t decided for sure whether or not they will be incorporated into this section of the patio design.
More on patio and paver design coming soon! And a new post on stone color considerations. (November 2011)
Stucco Series – Time to Mix and Apply
by admin on Jul.13, 2011, under Favorites, Images, Real Estate
All the prep-work is now completed, you have your tools ready, and it is time to start mixing and applying stucco.
In this 3-coat process, the following will be applied:
Note: The cement portion can also be made up of a lime/cement mixture.
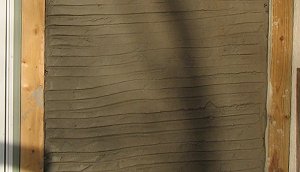
Scratch coat – 1 part cement to 2-1/4 to 4 parts sand
This first base coat has a purpose of covering the metal lath and preparing a surface to hold the next two coats to come. Once this coat of mix is applied, the surface is “scratched” or etched to provide grip for the brown coat. If you were painting instead of doing stucco, this is the block or base coat. It looks something like this.
You can buy a professional tool to do this “scratching” or you can just save your money and do it yourself. No one will care whether your scratched lines are perfect or straight – trust me…depth is more important and you want to scratch about 1/2-way through this base coat. Leave a ledge, not a trough.
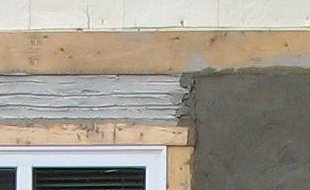
Brown coat - 1 part cement to 3 to 5 parts sand
The second coat uses the scratch coat for its base and begins the smoothing process for what will hopefully be a very smooth finish coat. This is a good time to note any areas of concern and use the brown coat to level out or fill areas not managed during the scratch coat. I added this image to show a little merge between scratch and brown coats…
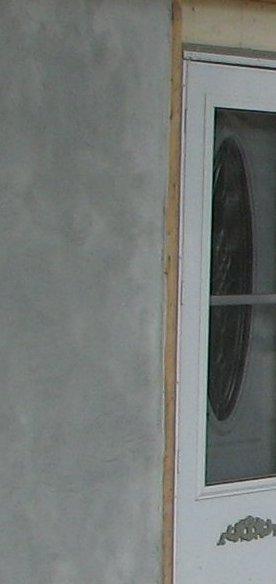
Finish coat – 1 part cement to 1-1/2 to 3 parts sand.
The final, finish coat is much thinner than the first two applications. Its purpose is to “finish” the smoothing started during the brown coat process and to give you a chance to add any decorative textures. If you’ve put down a fairly smooth brown coat, and take your time with the finish coat, you might be surprised to find the texture is already there – unless you want fancy swirls and twirls – which you’ll need to think on in advance of this finish coat. This image was taken before the coat was fully cured and dry, but it looks smooth enough for my purposes.
You’ll need to keep all coats misted for the first 48 hours or so. This helps the curing process and strengthens your final product. I misted this mostly-shaded project 3 times a day for 2 days and then once or twice for a day or so after that.
Link ~ For specs on the thick/thin aspects for each coat.
Link ~ For a whole page worth of FAQs to keep you out of trouble – from the Portland Cement Association. Invaluable info for those of us doing this stucco stuff for the first time!
Also FYI – There is a two-coat process for application to masonry and concrete…
Nearly finished – pun intended. And some updated photos coming soon!
Stucco Series – Prep Work Required
by admin on Jul.09, 2011, under Favorites, Images, Real Estate
Now that the wall is more secure and level and some final color preferences have been decided, it’s time to figure how to get a wet and somewhat drippy concrete/stucco mixture to adhere to an upright wall. This info also applies for anyone wishing to update their home’s exterior with a manufactured stone veneer. I’ve put a great resource for this product in a prior post.
The first layer is a sticky ice and water shield. This keeps water from crevices around windows and doors and keeps it flowing down and away from potential fill spaces. Some people apparently prefer to skip this step and handle any crevices later with a silicone caulk. Here’s a link to one particular ice and water product – shown being applied to a roof.

Next is waterproof, 2-ply tar paper which provides the moisture barrier to the plywood beneath. It is simply stapled in place, working from the bottom up, and making sure to allow enough to overlay, (4″ is recommended) from section to section for full coverage. Wrap paper securely around corners.
Third is metal lath. This stuff is a pain to cut and it isn’t cheap, but if applied as evenly as possible over your tar paper, this is the key to making your stucco mixture adhere to your walls. I can’t emphasize enough how important it is to keep your lath product as even and as flush as possible – particularly at corner seams. I’m not getting into specific prices here because they vary considerably from state to state and certainly from country to country.
In the US, Lowe’s is always a good place to start and there are plenty of online resources when it’s time to get down to calculating how much material you need, etc. Here are some links I found useful.
Stucco – some basic FAQ and answers
From Quikrete – My new best friend!
Fiberglass vs metal lath – go green!
Next: Now that the destination site is prepared, stucco tools and toys you’ll need.
Stucco Series – Design and Color Questions
by admin on Jul.07, 2011, under Favorites, Images, Real Estate
There has been a lot of time spent studying stucco over the last 6 months. Who knew that making the choice to use stucco to replace exterior siding would prompt so many design decisions.
I knew I wanted a English cottage appearance but since my name isn’t Hansel or Gretel and I’m not likely to do a thatched roof, I didn’t want this:
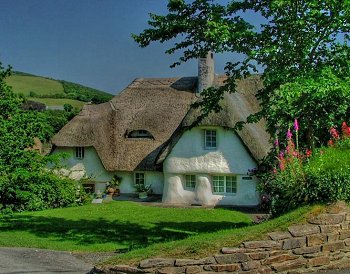
Quaint as it is, it isn’t really my style.
On the other hand, many stuccoed houses I saw ended up looking like commercial buildings or survival bunkers. What I wanted from stucco was a nice clean line and a little interesting texture – along with the added insulation from weather and noise.
I began studying what is known as “Cotswold” style. Close, but no cigar!
This style – along with its sister style Tudor, does not really go well with my one level house. Tudor looks great on large homes and commercial structures. Here is a photo I took of the Hotel Roanoke in Virginia. It is an impressive building, but all this trim color will make my little 1600 square-foot cottage look a little choppy and I will have trim to consider.

Hotel Roanoke, Virginia
I found the website Ontario Architecture which gave me some really good design ideas and an image fairly close to what I wanted.
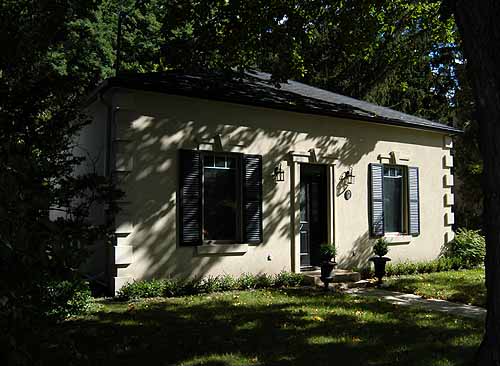
Clean lines, some nice opportunities for architectural design elements, and a natural-look color.
Color? Oh no. What about color? How do you get it, or not?
Back to The Mold Store I went since I’d already purchased powdered colorant for my paver stones. They had quite a few colors, but for my stuccoed walls I want a pearly-gray/white color. Early samples made from the very first stucco mix had the outcome a little too much brown tone for my taste.
Much of this color issue has to do with the sand portion of the stucco mix. Sand comes in a huge variety of shades and it all is certainly not white! Cement has less variety but from what I gather, true, Portland cement is the cleanest and brightest to work with.
Many people do not worry about the base stucco since they plan on painting it. I’m trying to avoid this step. This is not an adobe home with the standard southwestern colors and I really don’t want to have to paint this house after all this work.
A little further research found a whiter sand available nearby and the addition of white powder colorant to the finish mix got the stucco within the color range desired. This was still a little damp when the picture was taken.
Now, that it appeared the color was do-able, and I’m beginning to find ways to make a specific texture on the surface, how the heck do you make this stuff stay on the wall? That’s a story for another day…
Stucco Series – From the Ground Up
by admin on Jul.04, 2011, under Favorites, Images, Real Estate
On with the project…
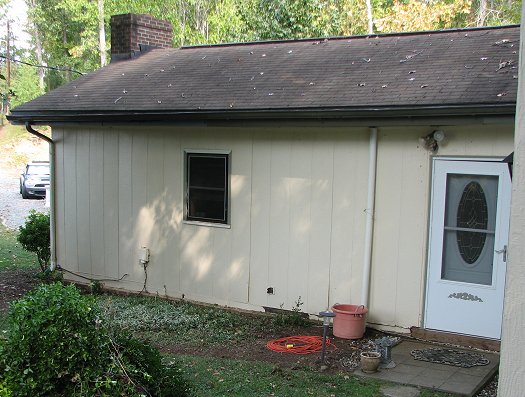
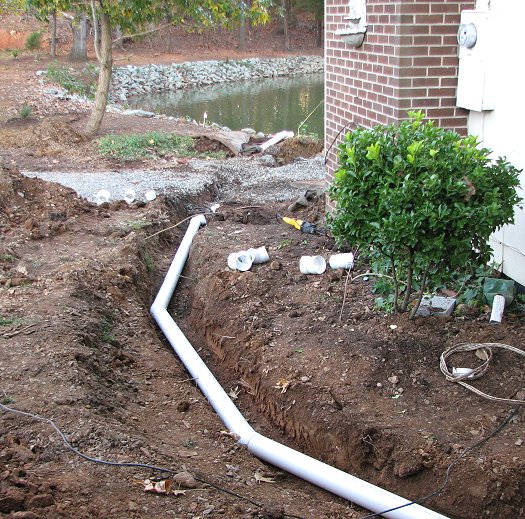
Removing the dirt from the back of the house (see first post), and installing a French drain was a good step in this home improvement process. But the back door was still stuck and the roof had a sway like a camel’s back you can see in image below.
On closer inspection we found the house had evolved from a foundation of wooden posts and railroad ties. After 50 years, the wooden posts were nothing but sawdust leaving the railroad ties resting directly on the ground.
What to do now? We came up with 3 options…
Bulldoze the entire house. Not bloody likely since we are actually living here. Who knows what the mortgage company would have to say.
Hire a contractor. Given that we couldn’t get a local company to come out and replace gutters, we were not confident that anyone could solve this problem. Without a standard foundation wall, hiring a wall-lifting or using a helical pier system like Ram Jack couldn’t even be considered
Fix it ourselves. We chose this option by default.
Using a simple hydraulic jack and heavy timbers we reinforced and leveled the roof – setting the vertical posts on hand-poured concrete footings.

We finished the base of the wall along its entire length with hand-poured concrete. I mention hand-poured concrete twice here because you may be surprised to find that it took 30 bags of Quik-Crete to accomplish this task. Hand mixing Quik-Crete is not a “quick” nor easy process.
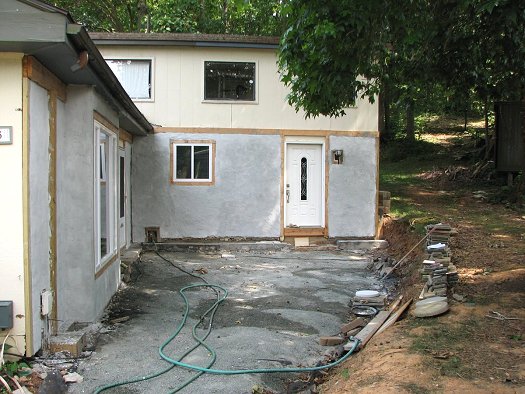
Now we have a square, level, functional but bland wall. It still needed something. Let there be light!
In older homes drafty and undersized windows are a chronic problem. Nothing improves the comfort of the home like energy-efficient dual-pane windows. Big box home improvement retailers have a wide variety to choose from at very reasonable prices. The small window in the wall needed to be replaced and at the time, this was the only window in the living room. We needed a new and bigger option.
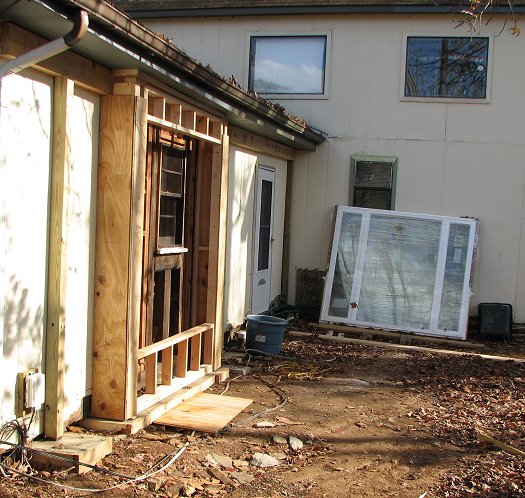
We considered a 3 x 3 foot window and a 4 x 4 foot window. We finally settled on a 7 foot wide by 6 foot tall monster window unit. Apparently this monster window was the subject of much awe and desire by all who viewed it at Lowe’s! Such a substantial window now needed a substantial wall. As with so many projects, what started out as a simple hole in the wall for a window, grew to a framed-out box to add character.
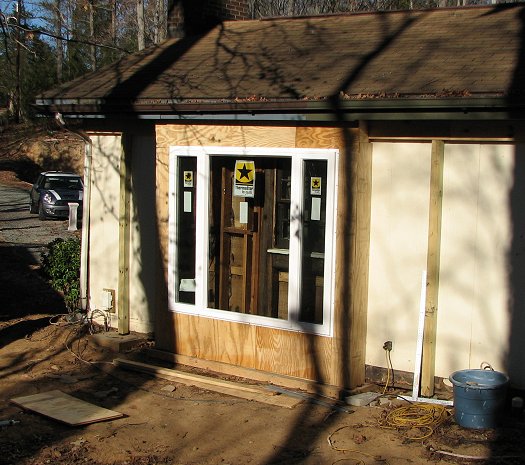
Now to secure the wall and make it weather-tight. We chose stucco.
The wall type had to be weather-tight, well insulated, and attractive – and affordable. We’d never done stucco before but we liked the look for our country cottage. Time to research stucco…
Stucco Series – Reboot
by admin on Jul.01, 2011, under Favorites, Images, Real Estate
Or maybe I should say, “Re-pour!”
I began what I called the “Stucco Series” a few weeks ago and then immediately realized I had started in the middle of the process. I also didn’t have the 9 months worth of info well-organized so…
…starting again – with the paver stones that began this latest round of DIY home improvements.
We started off wanting to make some of these:
We ordered a package of molds from The Mold Store. They’ve been a really handy resource and have been able to answer our questions about mold sizes and concrete colorant.
As you can see from the image above, we’ve been experimenting with various color effects – the latest being true white – which was harder to achieve than might be imagined. More on that later…
The pavers look like this in their raw state:
We weren’t super happy with this so decided a coat or two of polyurethane might bring out the texture and color variations to make these pavers look a bit more natural. It worked!
I was particularly pleased with the black pavers.
The stucco thoughts began as we were studying the “before” back of the house. This is the area intended for the new patio (and pavers), but there were obvious problems.
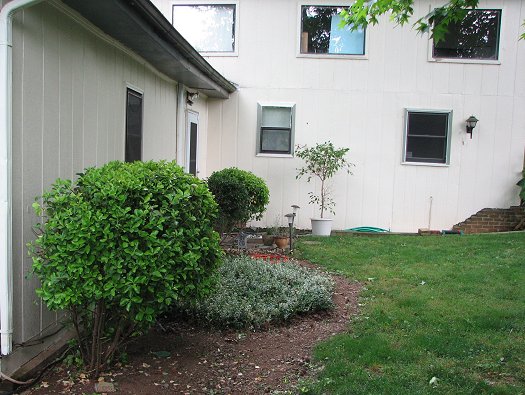
First, the house is about 50 years old. Various prior owners have added bits and pieces to it and then moved on. The Euonymous had already been massively trimmed but had been planted too close to the house. The ground cover needed constant management and was a major snake hiding zone.
Water came from, (right of the picture) higher up the hill, and straight down towards the house and the back door. We also needed more light inside and all the windows you see here needed to be replaced.
All this from a few paver stones and a couple bottles of Heineken on a September 2010 Sunday afternoon! I should have just stayed inside and watched NASCAR!
So while we’re working like Santa’s little elves making paver stones, we called our go-to earth-mover expert to dig us a ditch:
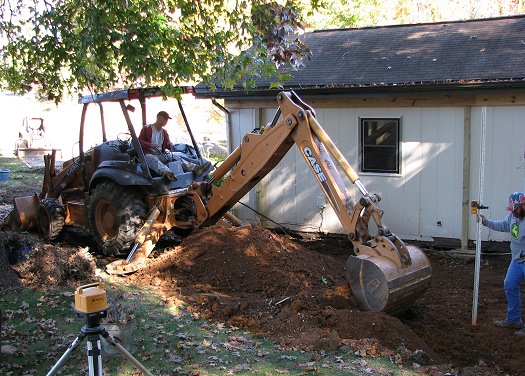
November 2010
These guys have WAY too much fun if you ask me!
They also put in a French drain to aid drainage and divert the water around and away from the house and out to the lake.
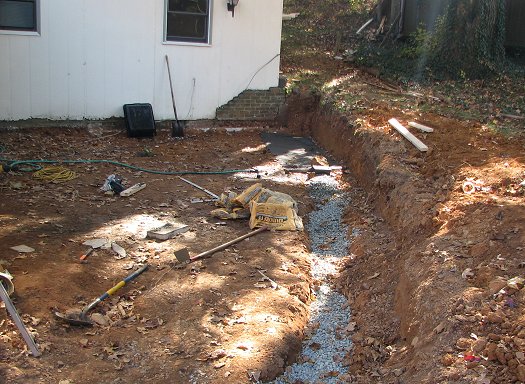
French drain
Where is the stucco you ask?
Getting to this:
June 2011
…hasn’t happened overnight but we’re making progress. First we had to replace those nasty windows and add a new window to gather more light for the living room…that will be coming soon!
Have a great and safe 4th of July weekend!