Archive for July, 2011
Unique Birdbaths – All Shapes and Sizes
by admin on Jul.31, 2011, under Favorites
There is a size and style birdbath for every garden or backyard.
Here are a few new ideas…


Hosta – Easy Garden Color for Shady Areas
by admin on Jul.27, 2011, under Favorites, Images
I’ll let these little low-maintenance plants speak for themselves…


Once-per-year photo-op – Kingfisher
by admin on Jul.22, 2011, under Images
This darn bird is here zooming around the lake all the time – usually early morning or late afternoon/evening. Incredibly noisy, incredibly fast…I get about one chance per year to get a good photo.
Here is the 2011 paparazzi catch:
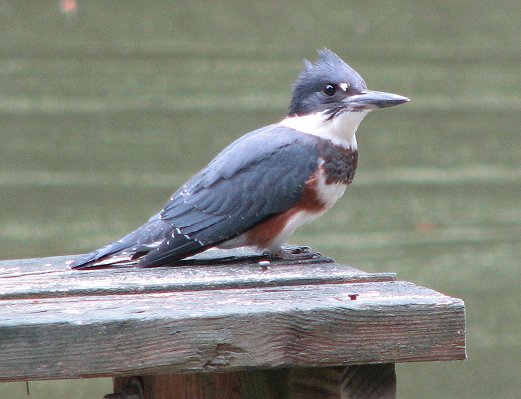
Female Belted Kingfisher
TGIF and stay cool this weekend!
Beat the Heat!
by admin on Jul.19, 2011, under Favorites
Sweltering heat might be the phrase best applied to Summer 2011. It’s mid-July now and many areas have already spent a month or more in normal July-August temperatures. I’m not looking forward to the next month+ of heat so it’s time to seek relief.
Here are a few of the latest outdoor cooling products including fans, collars, and hats – and a link to a photo of my neighbor enjoying the misting fan I bought for him! I’m not sure how either of us got along without it!

The Hoseless Evaporative Cooling Fan makes a patio or deck as comfortable as an air-conditioned room without being tethered to a garden hose. Encountered in luxury resorts and outdoor cafes, the fan reduces the air temperature by as much as 30\u00BA F by gently misting the surrounding area.
Six patented nozzles create micro-fine droplets that feel dry to the touch and evaporate almost instantly, providing refreshing cooling without the soaking spray common with lesser misting fans. An eight-gallon reservoir holds enough water for up to eight hours of continuous misting; the density of mist adjusts with a simple turn of a dial. The 30″ fan’s high-velocity three-speed motor is waterproof and can oscillate 50\u00BA, cooling up to a 1000′ sq. area. Because flying insects typically avoid wind and moisture, the fan also helps reduce these outdoor nuisances.
Here’s a smaller version of the one above:

The Evaporative Misting Fan emits evaporative mist to cool ambient air temperature by as much as 30º F. Three patented nozzles create microdroplets of mist that feel dry to the touch and evaporate instantly, creating a fan-driven, cooling mist that won’t dampen surfaces.
The 16″-diameter fan oscillates up to 90º and its blades adjust from 930 to 1,220 RPMs to cool up to 200′ sq. on a deck or patio.
Here’s a handy little item:

This Personal Cooling Collar produces a cooling breeze across the neck. The collar holds 4 oz. of water and its internal fan generates evaporative cooling across the back of the neck and base of the head. The interior of the collar is lined with aluminum that conducts a cooling sensation onto the back and sides of the neck.
The collar weighs less than 1 lb. and its two spring-loaded hinges allow it to rest gently yet securely against the neck, ensuring comfort and stability. It has two adjustable fan speeds that produce a soothing whirring sound and it is powered by the included AA battery that provides up to four hours of cooling.
And imagine the relief this could bring on a hot day standing out on a ball field…this cap could keep a lot of people from passing out or feeling sick in the summer heat. I’ve spent many an afternoon playing shortstop – never out of the sun, and could have used one of these caps. Wouldn’t hurt for those who sit in the stands either!

The patented fibers in this Evaporative Cooling Cap use evaporation to draw heat away in warm weather, keeping your head up to 30º cooler than outside air temperature. The hat is charged by running it under cool water, then wringing out the excess.
The cap has hydrophilic and hydrophobic fibers in a three-layer fabric that conducts body heat upwards, while retaining the cool water and releasing it slowly through evaporation. Even while the middle layer holds onto water, your head remains cool and dry thanks to an inner lining that water can’t permeate. Worn dry, it also provides effective insulation during cooler weather, trapping heat at a level far greater than non-insulated hats.
Be safe and stay cool…
A Favorite Trimmer
by admin on Jul.16, 2011, under Favorites
Due to abnormal heat levels and very little rain, I find there is less lawn mowing required this year and a lot more trimming instead. You can’t ask much more from a Trimmer (and this one even edges) than this…

This Rechargeable Yard Trimmer cut through 200′ sq. of weeds, tall grass, and saplings in only five minutes, unlike lesser models that managed to trim only 105′ sq. The model’s battery ran 65% longer than a competing trimmer and recharged in three hours, unlike lesser models that required up to five hours to recharge. When the trimmer line breaks, it automatically extends the correct length of line to ensure uninterrupted trimming, and simply tilting the head and folding down the integrated wheels convert the device into an edger.
The 5 3/4-lb. trimmer weighs half as much as gas models, its head tilts up to 90º to cut hard-to-reach areas under swing sets or lawn furniture, and a metal guard keeps flowers and plants from getting cut.
You just can’t beat lightweight and cordless when it comes to this task…
Stucco Series – Time to Mix and Apply
by admin on Jul.13, 2011, under Favorites, Images, Real Estate
All the prep-work is now completed, you have your tools ready, and it is time to start mixing and applying stucco.
In this 3-coat process, the following will be applied:
Note: The cement portion can also be made up of a lime/cement mixture.
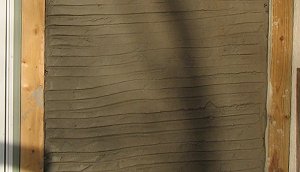
Scratch coat – 1 part cement to 2-1/4 to 4 parts sand
This first base coat has a purpose of covering the metal lath and preparing a surface to hold the next two coats to come. Once this coat of mix is applied, the surface is “scratched” or etched to provide grip for the brown coat. If you were painting instead of doing stucco, this is the block or base coat. It looks something like this.
You can buy a professional tool to do this “scratching” or you can just save your money and do it yourself. No one will care whether your scratched lines are perfect or straight – trust me…depth is more important and you want to scratch about 1/2-way through this base coat. Leave a ledge, not a trough.
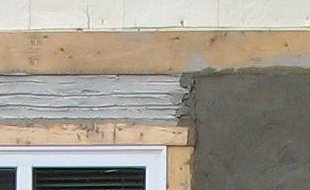
Brown coat - 1 part cement to 3 to 5 parts sand
The second coat uses the scratch coat for its base and begins the smoothing process for what will hopefully be a very smooth finish coat. This is a good time to note any areas of concern and use the brown coat to level out or fill areas not managed during the scratch coat. I added this image to show a little merge between scratch and brown coats…
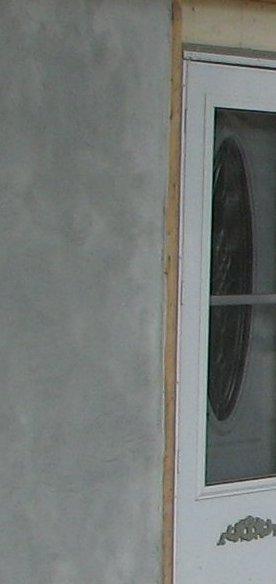
Finish coat – 1 part cement to 1-1/2 to 3 parts sand.
The final, finish coat is much thinner than the first two applications. Its purpose is to “finish” the smoothing started during the brown coat process and to give you a chance to add any decorative textures. If you’ve put down a fairly smooth brown coat, and take your time with the finish coat, you might be surprised to find the texture is already there – unless you want fancy swirls and twirls – which you’ll need to think on in advance of this finish coat. This image was taken before the coat was fully cured and dry, but it looks smooth enough for my purposes.
You’ll need to keep all coats misted for the first 48 hours or so. This helps the curing process and strengthens your final product. I misted this mostly-shaded project 3 times a day for 2 days and then once or twice for a day or so after that.
Link ~ For specs on the thick/thin aspects for each coat.
Link ~ For a whole page worth of FAQs to keep you out of trouble – from the Portland Cement Association. Invaluable info for those of us doing this stucco stuff for the first time!
Also FYI – There is a two-coat process for application to masonry and concrete…
Nearly finished – pun intended. And some updated photos coming soon!
Stucco Series – Tools and Toys
by admin on Jul.13, 2011, under Favorites, Images, Real Estate
When it comes to a stucco project, playing in the sand takes on a whole new meaning.
This is not a clean and easy project. It’s hard work, with heavy lifting at times, and lots of reaching and bending. A few specific tools are absolutely necessary. Water – as both a tool and an ingredient – needs to also be at ready supply and access.
If you enter through the Contractor’s Entrance at any Lowe’s Home Improvement and bear left, you’ll likely find bins with most of the Masonry and concrete tools you’ll need – along with cement, sand, and lime (and usually some powdered concrete colorant,) stacked along the far wall. If you’re having a really lucky day, you might find a Masonry Professional enjoying a few spare minutes out of the weather and buying his own supplies – and he might be willing to give you some input if asked.
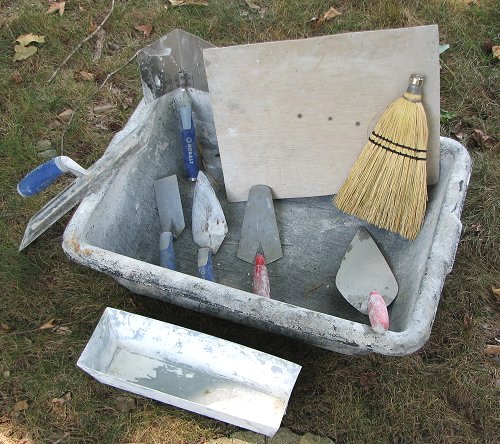
Toys, I mean tools…
Most of these were purchased at Lowe’s – many are Kobalt brand which proved to be a little more expensive but proved to be very sturdy. Bon-Tool (online) also has a huge assortment though a lot of their products are geared for the professional trade. I think most of these items are self-explanatory with a few notes.
A hawk was not purchased for this project – one was made by taking a section of shingle that happened to be lying around and nailing a block of wood centered on one side. This worked fine here, you may prefer to purchase.
The little winged Kobalt tool standing in the left upper corner of the mixing tray was supposed to be used for corners. I found it a waste of time. If your metal lath, scratch and brown coats are done with care, corners can be done with the other trowels.
I started with smaller trowels since the wall had separate and small sections anyway. I felt this work in my wrists and arm muscles for about the first two days. After that, and after gaining more confidence, I moved on to using more mixture, a larger trowel, and began getting stucco applied in a much more efficient manner.
The whisk broom was used to smooth the brown and finish coats – again this is based on your finish preference.
Most of these items run from $10 to $20 a piece. Throw in a tray to mix it all in and you’re ready to begin! All of this was mixed by hand. Until the arrival of the cement mixer…more on that purchase later… (Updated 11/14/2011)
For now, let’s figure out how to get this stuff on a wall…
Fall planting – Order Bulbs Online
by admin on Jul.12, 2011, under Images, Real Estate
Once Labor Day arrives, it is amazing how fast the time speeds forward to Halloween, Thanksgiving, and Christmas. Mentioning Christmas, or even Labor Day in July may seem ridiculous unless you are a gardener who wants to plant bulbs in the Fall for Spring/Summer color 2012. In that case, now is the time to start planning your plantings.
While temperatures are soaring outdoors, spend a little time inside doing your bulb research :
+ Spring Flower Bulbs
+ Fall Bulbs
You can’t have garden color like this:

unless you get them ordered and planted this Fall…
5 Favorite Birdbaths…
by admin on Jul.12, 2011, under Favorites, Quick Deals!
While the temperatures are hovering around 100 – with heat indexes closer to 110, it’s hard not to notice how much time birds are spending searching for cool, clean water. Even bees are to be found hanging around the edge of the two birdbaths here at the lake. The lake water temperature by now feels more like bath water – not particularly refreshing.
Here are 5 of my favorite baths for the birds. If you have a spot in your garden and hang feeders, birds will really appreciate the opportunity for a cool down.


Depending on where you are, there are at least two more months of warm-to-hot weather. Still plenty of time for you, and the birds, to enjoy this addition to your garden. No guest towels required!
Shop Plow & Hearth’s BEST OF SUMMER SALE
Stucco Series – Prep Work Required
by admin on Jul.09, 2011, under Favorites, Images, Real Estate
Now that the wall is more secure and level and some final color preferences have been decided, it’s time to figure how to get a wet and somewhat drippy concrete/stucco mixture to adhere to an upright wall. This info also applies for anyone wishing to update their home’s exterior with a manufactured stone veneer. I’ve put a great resource for this product in a prior post.
The first layer is a sticky ice and water shield. This keeps water from crevices around windows and doors and keeps it flowing down and away from potential fill spaces. Some people apparently prefer to skip this step and handle any crevices later with a silicone caulk. Here’s a link to one particular ice and water product – shown being applied to a roof.
Next is waterproof, 2-ply tar paper which provides the moisture barrier to the plywood beneath. It is simply stapled in place, working from the bottom up, and making sure to allow enough to overlay, (4″ is recommended) from section to section for full coverage. Wrap paper securely around corners.
Third is metal lath. This stuff is a pain to cut and it isn’t cheap, but if applied as evenly as possible over your tar paper, this is the key to making your stucco mixture adhere to your walls. I can’t emphasize enough how important it is to keep your lath product as even and as flush as possible – particularly at corner seams. I’m not getting into specific prices here because they vary considerably from state to state and certainly from country to country.
In the US, Lowe’s is always a good place to start and there are plenty of online resources when it’s time to get down to calculating how much material you need, etc. Here are some links I found useful.
Stucco – some basic FAQ and answers
From Quikrete – My new best friend!
Fiberglass vs metal lath – go green!
Next: Now that the destination site is prepared, stucco tools and toys you’ll need.